M
Mandee
Guest
- Thread Author
- #1
Need a place to primp and polish? Let’s make one! Today we’re assembling another classically elegant project. So, gather your supplies and put this 3D vanity together with me!


My lovely patrons picked this pretty design! Each month, my Patreon subscribers help me choose the projects I create, and this design was one of the top picks for July.
If you enjoy my work and would like to help choose future projects/freebies, consider becoming a patron of Designs By Miss Mandee!


Print
Learn how to assemble this cute little piece of furniture.
1. Use your cutting machine or X-ACTO knife, along with my template, to cut out all of the pieces of your 3D vanity.
Note: If you are using the SVG files that includes the score lines, don’t forget to set them as such in Cricut Design Space and attach them to their shapes before sending them through your cutting machine. I used a lime green color to mark the score lines, so hopefully that helps! If you’re having trouble with the score lines, check out this video.
2. Start by layering the mirror, drawer, and other decorative pieces as shown in the first photo, below.
Then, take the largest piece and fold along the score lines. Curve the side pieces (with the little tabs) and attach them to the top of the vanity. Don’t attach the bottom pieces quite yet.
Next, take the mirror piece and attach it to the top of the vanity table using the tabs/slits provided.

3. Gather the three pieces shown in the first photo below. Attach them together by inserting the piece with the two small tabs into the slits in each of the other pieces.
Attach the whole thing to the center/inside of the vanity.
Then, finish attaching the bottom pieces of the vanity table.
Glue the final two decorative pieces of the vanity to the curved sides.

4. Assemble the drawer by folding along the score lines and attaching the sides together. Then, glue the drawer face to the front.
Attach a small piece of ribbon to the front to create a drawer-pull, and slide it into the open space in the vanity.

5. Take your leg pieces that have a tab on top and attach a matching leg to the front and the back with hot glue or foam tape (for added thickness).
Attach the legs to the underside of the vanity.
Assemble the stool by folding along the score lines and attaching the sides together, and your vanity is complete!

As a little girl, I always thought it would be so cool to have a vanity like this in my room! And as a teen who took my morning routine very seriously, I would have found it really useful.

I use Adobe Illustrator for all of my designs, and a Cricut Maker to bring my creations to life. For tips on creating fun paper cuts like this one, see the FAQ section on my website. Also, be sure to check out the other fun freebies available on my blog!
Enjoy making this 3D vanity for yourself! I’d love to see your results, so be sure to share them with me by either tagging me on Instagram or by sharing your work in my Facebook Group.


The post 3D Vanity – Furniture Cut File appeared first on Designs By Miss Mandee.

Like this design? Consider leaving a tip to show your support.
My lovely patrons picked this pretty design! Each month, my Patreon subscribers help me choose the projects I create, and this design was one of the top picks for July.
If you enjoy my work and would like to help choose future projects/freebies, consider becoming a patron of Designs By Miss Mandee!


Watch a short video of me putting this project together on Instagram.
3D Vanity
Learn how to assemble this cute little piece of furniture.
Ingredients
- Cardstock
- Precision Craft Glue or a Glue Stick
- Hot Glue
- Bone Folder optional
- Decorative Ribbon optional
- A Cutting Machine or X-ACTO knife
- My Free Template
Instructions
- Use your cutting machine or X-ACTO knife, along with my template, to cut out all of the pieces of your 3D vanity.Note: If you are using the SVG files that includes the score lines, don't forget to set them as such in Cricut Design Space and attach them to their shapes before sending them through your cutting machine. I used a lime green color to mark the score lines, so hopefully that helps! If you're having trouble with the score lines, check out this video.
- Start by layering the mirror, drawer, and other decorative pieces as shown in the first photo, below.Then, take the largest piece and fold along the score lines. Curve the side pieces (with the little tabs) and attach them to the top of the vanity. Don't attach the bottom pieces quite yet.Next, take the mirror piece and attach it to the top of the vanity table using the tabs/slits provided.

- Gather the three pieces shown in the first photo below. Attach them together by inserting the piece with the two small tabs into the slits in each of the other pieces.Attach the whole thing to the center/inside of the vanity.Then, finish attaching the bottom pieces of the vanity table.Glue the final two decorative pieces of the vanity to the curved sides.

- Assemble the drawer by folding along the score lines and attaching the sides together. Then, glue the drawer face to the front.Attach a small piece of ribbon to the front to create a drawer-pull, and slide it into the open space in the vanity.

- Take your leg pieces that have a tab on top and attach a matching leg to the front and the back with hot glue or foam tape (for added thickness).Attach the legs to the underside of the vanity.Assemble the stool by folding along the score lines and attaching the sides together, and your vanity is complete!

Notes
When assembled, this project is about 5.5" tall, 5.5" wide, and 1" deep.Supplies
- Cardstock
- Precision Craft Glue or a Glue Stick
- Hot Glue
- Bone Folder (optional)
- Decorative Ribbon (optional)
- A Cutting Machine or X-ACTO knife
- My Free Template
How to Make It
1. Use your cutting machine or X-ACTO knife, along with my template, to cut out all of the pieces of your 3D vanity.
Note: If you are using the SVG files that includes the score lines, don’t forget to set them as such in Cricut Design Space and attach them to their shapes before sending them through your cutting machine. I used a lime green color to mark the score lines, so hopefully that helps! If you’re having trouble with the score lines, check out this video.
2. Start by layering the mirror, drawer, and other decorative pieces as shown in the first photo, below.
Then, take the largest piece and fold along the score lines. Curve the side pieces (with the little tabs) and attach them to the top of the vanity. Don’t attach the bottom pieces quite yet.
Next, take the mirror piece and attach it to the top of the vanity table using the tabs/slits provided.
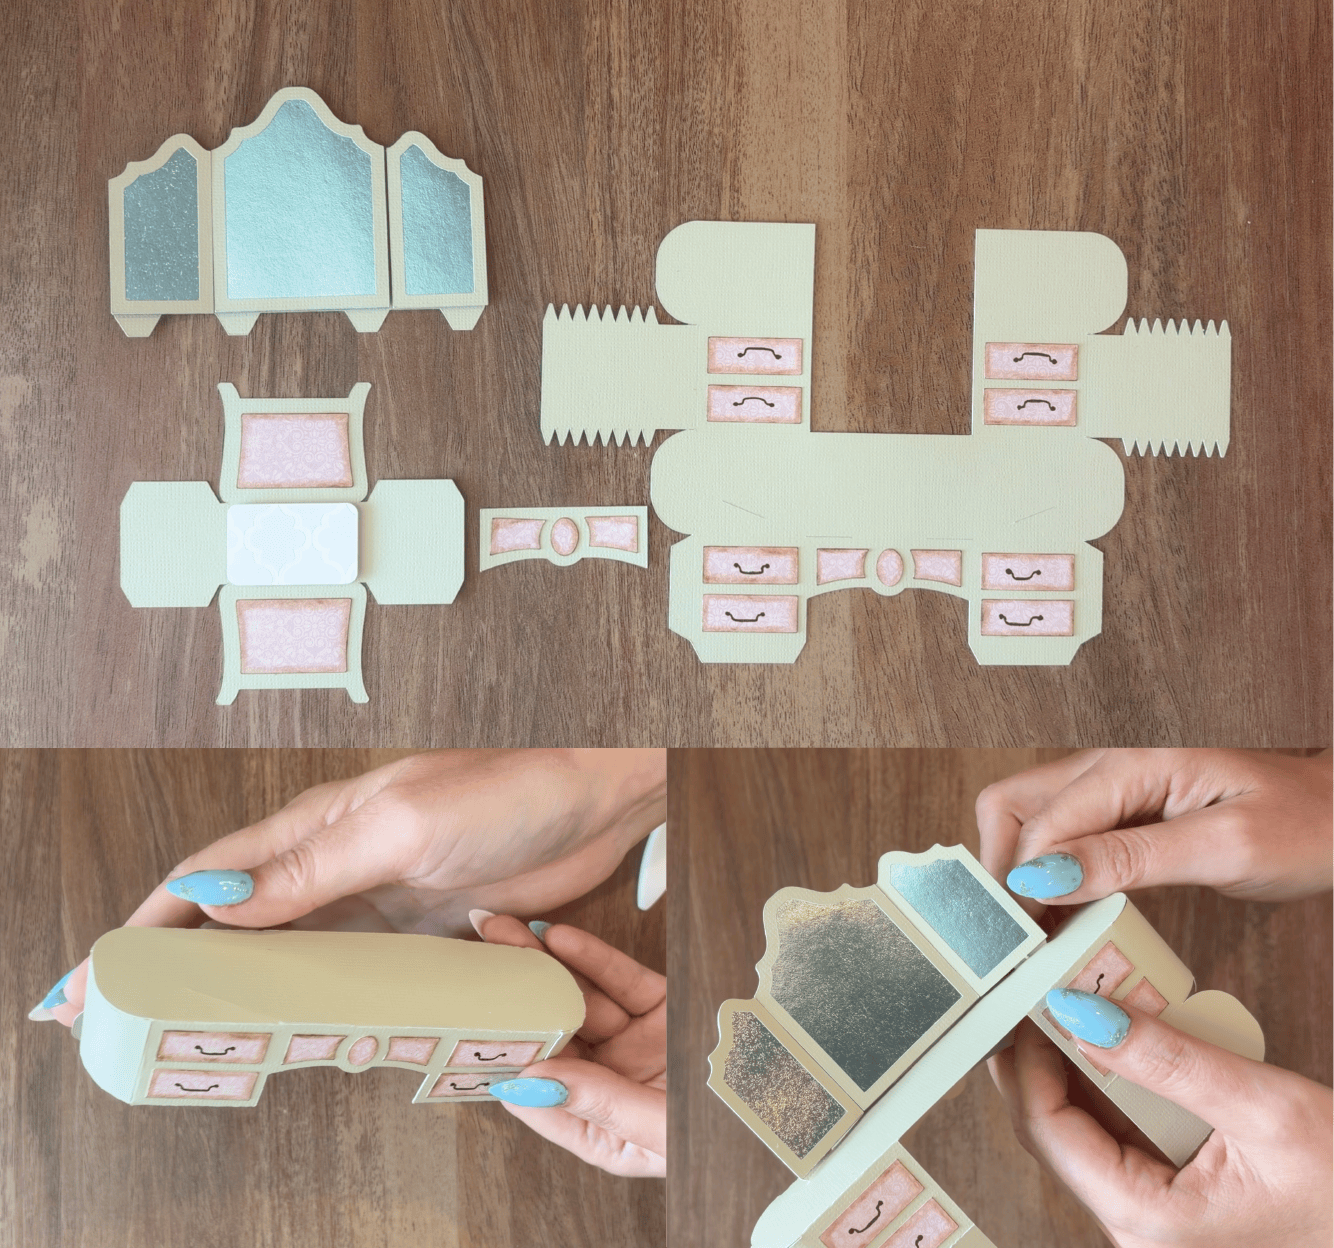
3. Gather the three pieces shown in the first photo below. Attach them together by inserting the piece with the two small tabs into the slits in each of the other pieces.
Attach the whole thing to the center/inside of the vanity.
Then, finish attaching the bottom pieces of the vanity table.
Glue the final two decorative pieces of the vanity to the curved sides.

4. Assemble the drawer by folding along the score lines and attaching the sides together. Then, glue the drawer face to the front.
Attach a small piece of ribbon to the front to create a drawer-pull, and slide it into the open space in the vanity.
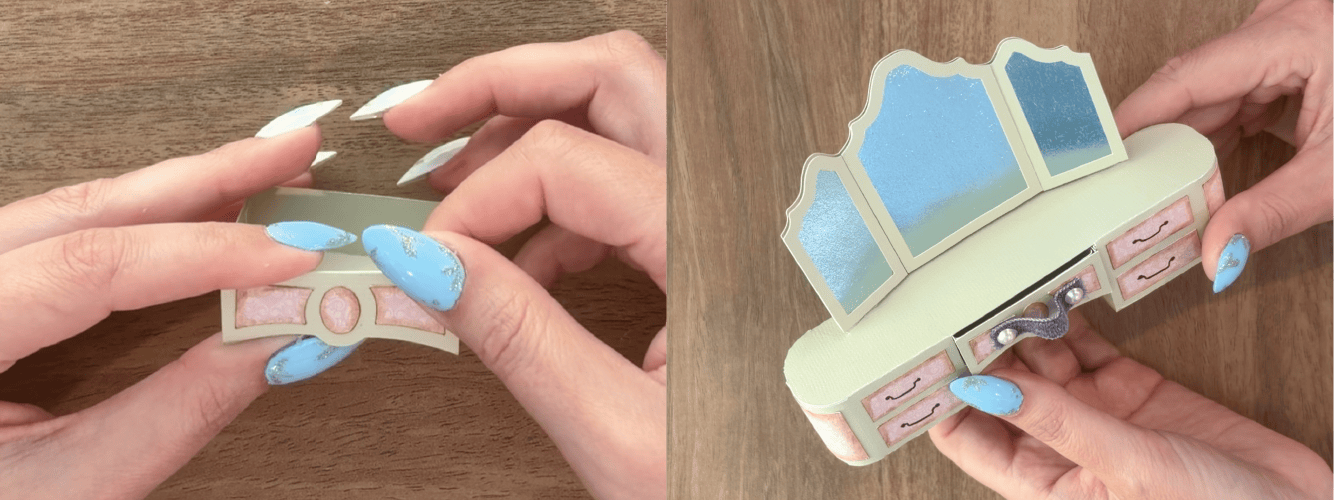
5. Take your leg pieces that have a tab on top and attach a matching leg to the front and the back with hot glue or foam tape (for added thickness).
Attach the legs to the underside of the vanity.
Assemble the stool by folding along the score lines and attaching the sides together, and your vanity is complete!
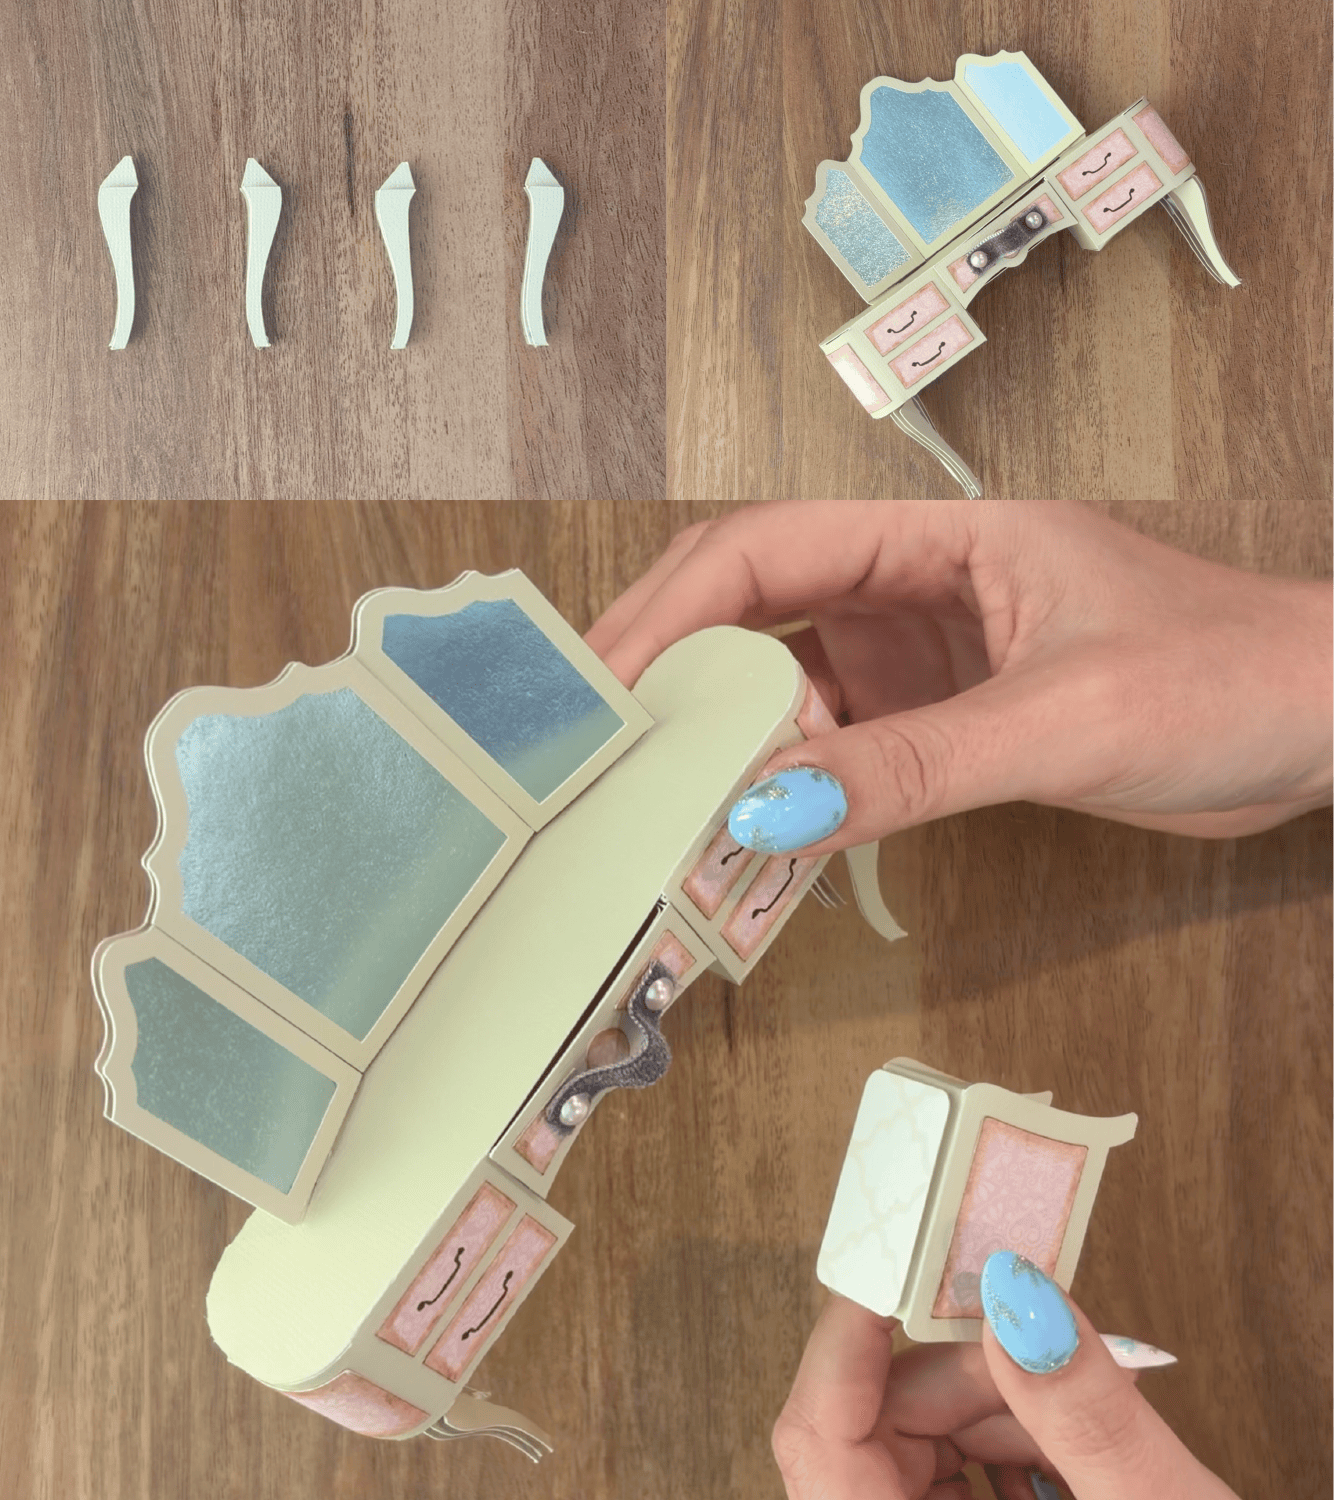
As a little girl, I always thought it would be so cool to have a vanity like this in my room! And as a teen who took my morning routine very seriously, I would have found it really useful.

I use Adobe Illustrator for all of my designs, and a Cricut Maker to bring my creations to life. For tips on creating fun paper cuts like this one, see the FAQ section on my website. Also, be sure to check out the other fun freebies available on my blog!
Enjoy making this 3D vanity for yourself! I’d love to see your results, so be sure to share them with me by either tagging me on Instagram or by sharing your work in my Facebook Group.


*This post contains affiliate links. By clicking through my links to make a purchase, you are supporting this blog and the hard work that goes into providing free, quality designs.
The post 3D Vanity – Furniture Cut File appeared first on Designs By Miss Mandee.